d3vilh/openvpn-ui
Web User Interface for OpenVPN
100K+
d3vilh/openvpn-ui repository overview
OpenVPN UI
OpenVPN server web administration interface.
Quick to deploy and easy to use, makes work with small OpenVPN environments a breeze.


Features
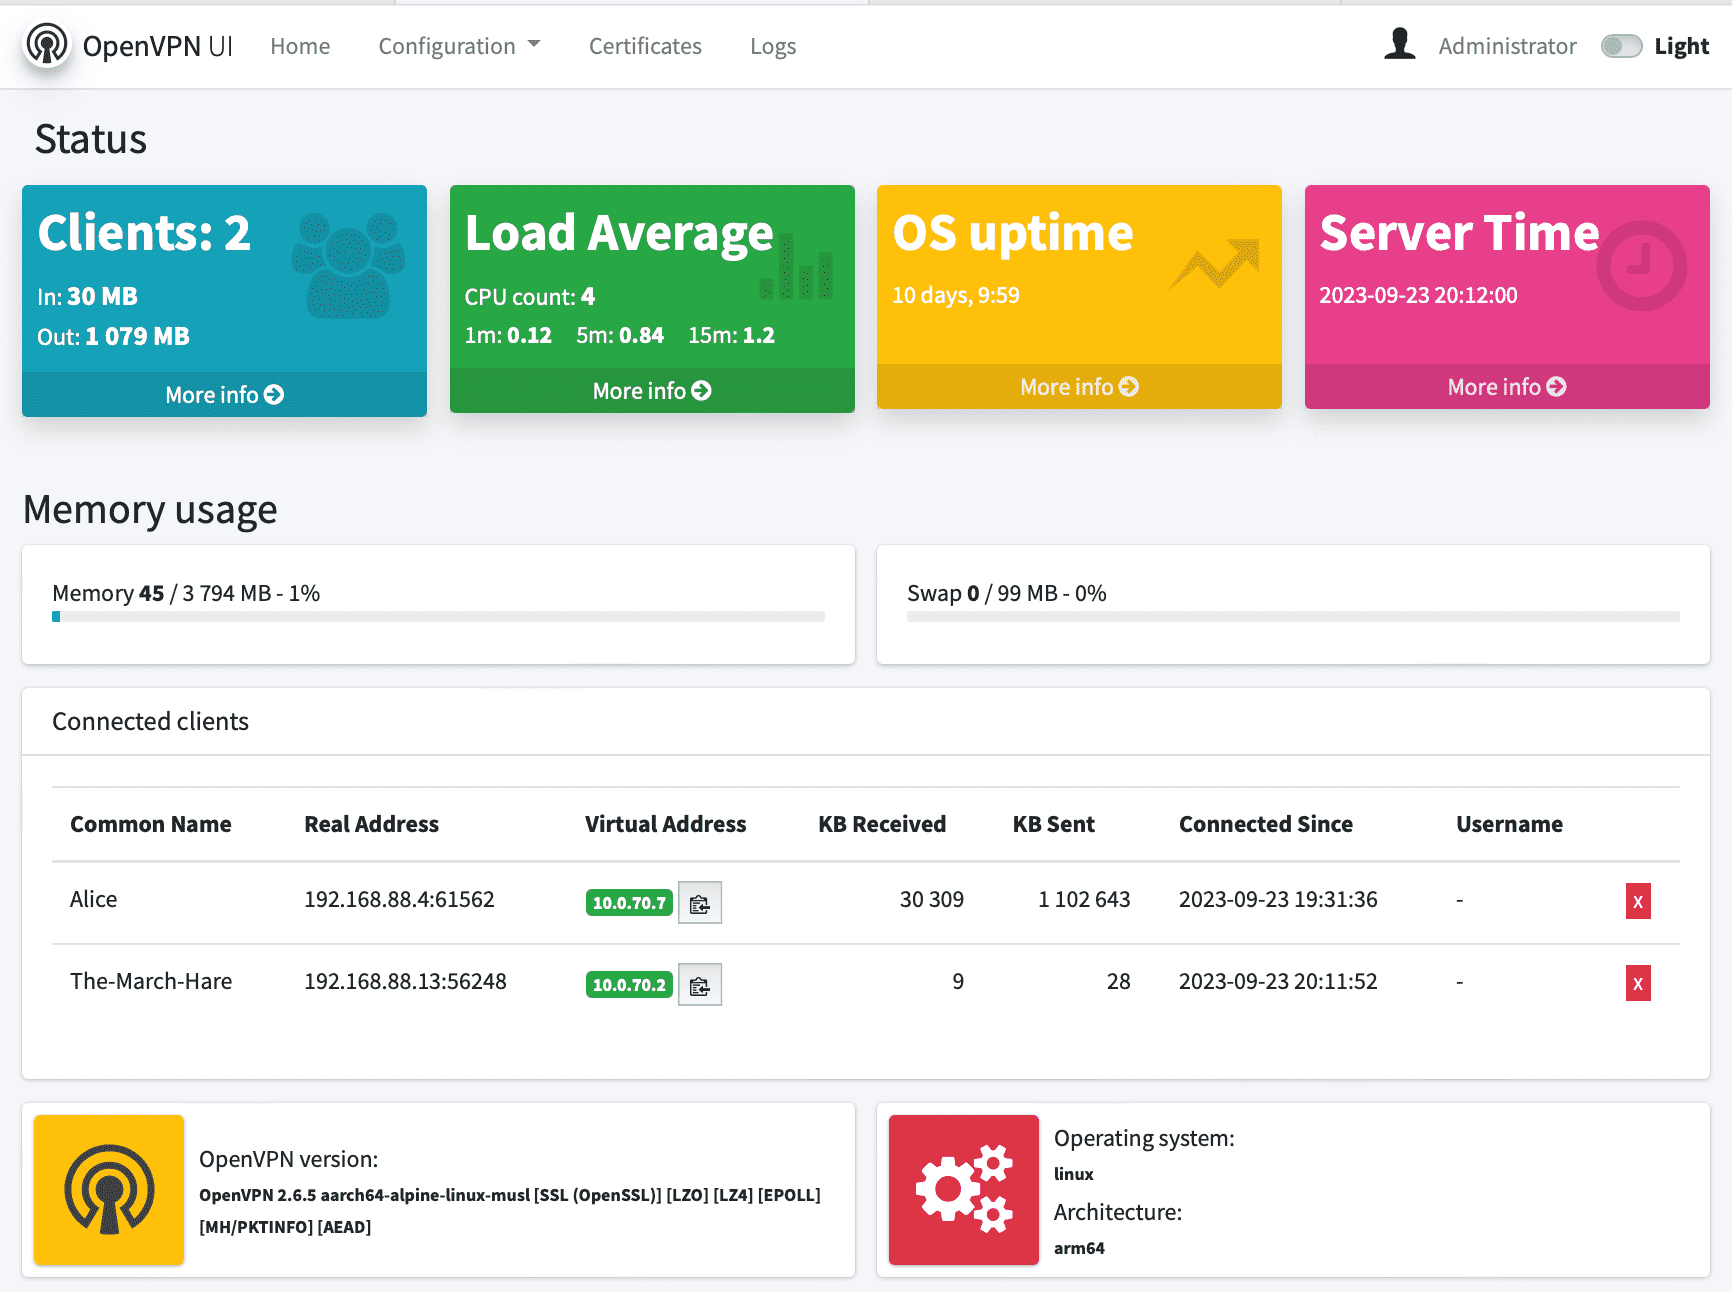
- Status page that shows server statistics and list of connected clients
- Easy to generate, download, renew, revoke and delete client certificates
- Client can have secret passphrase and static IP assigned during client certificate generation
- Change predefined EasyRSA vars including certificates and CRL expiration time
- Maintain EasyRSA PKI infrastructure (init, build-ca, gen-dh, build-crl, gen-ta, revoke)
- Change OpenVPN Server configuration via web interface
- Easy to preview OpenVPN Server logs
- Restart OpenVPN Server and OpenVPN UI from web interface
- OpenVPN-UI Admin user and password can be passed via environment variables to container
- Updated infrustracture:
- Beego 2.1 with all vulnerabilities fixed (more than 200 CVEs)
- Easy-rsa 3.X
- Openssl 3.X
- OpenVPN 2.5.8 Server is fully compatible
- Compatible OpenVPN Server images can be found on Docker Hub - d3vilh/openvpn-server:latest
- As well as Openvpn-UI itself - d3vilh/openvpn-ui:latest
- Support any architecture, ready images for AMD64 and ARM available on Docker Hub.
Part of following projects:
- Openvpn-aws OpenVPN and OpenVPN-UI for any Cloud, VM or x86 bare metal server.
- Raspberry-gateway simple yet powerful home gateway environment with Pi-Hole +Unbound, VPN, Torrent client and Internet monitoring, all managed by Portainer.
Installation
For best experience, it is recommended to deploy it within a Docker environment consisting of two distinct containers:
- The OpenVPN Server Back-End container (openvpn) for running OpenVPN server.
- OpenVPN UI Front-End container (openvpn-ui) for efficient management of the OpenVPN server environment.
However it works fine as standalone application with standalove OpenVPN server as well.
Intel x86 and AMD64 platforms
For Baremetal x86-64 servers, Cloud or VM installation, please use openvpn-aws project. It includes all the necessary scripts for easy installation of OpenVPN-UI and OpenVPN server on any x86-64 platform.
Raspberry-pi and other ARM platforms
For Raspberry-Pi and other ARM devices, consider Raspberry-Gateway project. It has all the necessary scripts for easy installation and lot of additional features.
Manual installation
With Docker-compose
Running this image with docker-compose.yml file
    openvpn-ui:
       container_name: openvpn-ui
       image: d3vilh/openvpn-ui:latest
       environment:
           - OPENVPN_ADMIN_USERNAME={{ ovpnui_user }}
           - OPENVPN_ADMIN_PASSWORD={{ ovpnui_password }}
       privileged: true
       ports:
           - "8080:8080/tcp"
       volumes:
           - ./:/etc/openvpn
           - ./db:/opt/openvpn-gui/db
           - ./pki:/usr/share/easy-rsa/pki
           - /var/run/docker.sock:/var/run/docker.sock:ro
       restart: always
You can couple OpenVPN-UI with recommended d3vilh/openvpn-server image and here is updated docker-compose.yml for it:
---
version: "3.5"

services:
    openvpn:
       container_name: openvpn
       image: d3vilh/openvpn-server:latest
       privileged: true
       ports:
          - "1194:1194/udp"
       environment:
           TRUST_SUB: 10.0.70.0/24
           GUEST_SUB: 10.0.71.0/24
           HOME_SUB: 192.168.88.0/24
       volumes:
           - ./pki:/etc/openvpn/pki
           - ./clients:/etc/openvpn/clients
           - ./config:/etc/openvpn/config
           - ./staticclients:/etc/openvpn/staticclients
           - ./log:/var/log/openvpn
           - ./fw-rules.sh:/opt/app/fw-rules.sh
       cap_add:
           - NET_ADMIN
       restart: always

    openvpn-ui:
       container_name: openvpn-ui
       image: d3vilh/openvpn-ui:latest
       environment:
           - OPENVPN_ADMIN_USERNAME=admin
           - OPENVPN_ADMIN_PASSWORD=gagaZush
       privileged: true
       ports:
           - "8080:8080/tcp"
       volumes:
           - ./:/etc/openvpn
           - ./db:/opt/openvpn-gui/db
           - ./pki:/usr/share/easy-rsa/pki
           - /var/run/docker.sock:/var/run/docker.sock:ro
       restart: always
Where:
TRUST_SUBis Trusted subnet, from which OpenVPN server will assign IPs to trusted clients (default subnet for all clients)GUEST_SUBis Gusets subnet for clients with internet access onlyHOME_SUBis subnet where the VPN server is located, thru which you get internet access to the clients with MASQUERADEfw-rules.shis bash file with additional firewall rules you would like to apply during container start
docker_entrypoint.sh will apply following Firewall rules:
IPT MASQ Chains:
MASQUERADE  all  --  ip-10-0-70-0.ec2.internal/24  anywhere
MASQUERADE  all  --  ip-10-0-71-0.ec2.internal/24  anywhere
IPT FWD Chains:
       0        0 DROP       1    --  *      *       10.0.71.0/24         0.0.0.0/0            icmptype 8
       0        0 DROP       1    --  *      *       10.0.71.0/24         0.0.0.0/0            icmptype 0
       0        0 DROP       0    --  *      *       10.0.71.0/24         192.168.88.0/24
Here is possible content of fw-rules.sh file to apply additional rules:
~/openvpn-server $ cat fw-rules.sh
iptables -A FORWARD -s 10.0.70.88 -d 10.0.70.77 -j DROP
iptables -A FORWARD -d 10.0.70.77 -s 10.0.70.88 -j DROP
With Dockerfile
Run this image using the Dockerfile
Run the OpenVPN-UI image
docker run \
-v /home/pi/openvpn:/etc/openvpn \
-v /home/pi/openvpn/db:/opt/openvpn-gui/db \
-v /home/pi/openvpn/pki:/usr/share/easy-rsa/pki \
-v /home/pi/openvpn/log:/var/log/openvpn \
-v /var/run/docker.sock:/var/run/docker.sock \
-e OPENVPN_ADMIN_USERNAME='admin' \
-e OPENVPN_ADMIN_PASSWORD='gagaZush' \
-p 8080:8080/tcp \
--privileged d3vilh/openvpn-ui:latest
Run the OpenVPN Server image:
cd ~/openvpn-server/ &&
docker run  --interactive --tty --rm \
  --name=openvpn-server \
  --cap-add=NET_ADMIN \
  -p 1194:1194/udp \
  -e TRUST_SUB=10.0.70.0/24 \
  -e GUEST_SUB=10.0.71.0/24 \
  -e HOME_SUB=192.168.88.0/24 \
  -v ./pki:/etc/openvpn/pki \
  -v ./clients:/etc/openvpn/clients \
  -v ./config:/etc/openvpn/config \
  -v ./staticclients:/etc/openvpn/staticclients \
  -v ./log:/var/log/openvpn \
  -v ./fw-rules.sh:/opt/app/fw-rules.sh \
  --privileged d3vilh/openvpn-server:latest
Building own image
Building own image
Prerequisites
As prerequisite, you need to have Docker and GoLang to be installed and running:
sudo apt-get install docker.io -y
sudo systemctl restart docker
To install Golang go to https://go.dev/dl and copy download URL for Go1.20.X version of your arch and follow the instructions below.
Example for ARM64:
wget https://golang.org/dl/go1.20.linux-arm64.tar.gz
sudo tar -C /usr/local -xzf go1.20.linux-arm64.tar.gz
echo "export PATH=$PATH:/usr/local/go/bin" >> /etc/profile
source /etc/profile
go version
Building the image
To build the OpenVPN-UI image:
cd build; ./build_openvpn-ui.sh
The new image will have openvpn-ui name.
Configuration
OpenVPN UI can be accessed on own port (*e.g. http://localhost:8080), the default user and password is admin/gagaZush preconfigured in config.yml if you are using Raspberry-Gateway or Openvpn-aws projects. For standalone installation, you can pass your own credentials via environment variables to container (refer to Manual installation).
Container volume
The container volume can be inicialized by using the d3vilh/openvpn-server image with included scripts to automatically generate everything you need on the first run:
- Diffie-Hellman parameters
- an EasyRSA CA key and certificate
- a new private key
- a self-certificate matching the private key for the OpenVPN server
- a TLS auth key from HMAC security
However you can generate all the above components on OpenVPN UI Configuration > Maintenance page post installation process.
EasyRSA vars
If you are running OpenVPN-UI manually please be sure easy-rsa.vars is set properly and placed in .config container volume as easy-rsa.vars.
In this case your custom EasyRSA options will be applied on the first OpenVPN Server start post PKI init step.
Default EasyRSA configuration can be set in ~/openvpn-server/config/easy-rsa.vars file:
set_var EASYRSA_DN           "org"
set_var EASYRSA_REQ_COUNTRY  "UA"
set_var EASYRSA_REQ_PROVINCE "KY"
set_var EASYRSA_REQ_CITY     "Kyiv"
set_var EASYRSA_REQ_ORG      "SweetHome"
set_var EASYRSA_REQ_EMAIL    "[email protected]"
set_var EASYRSA_REQ_OU       "MyOrganizationalUnit"
set_var EASYRSA_REQ_CN       "server"
set_var EASYRSA_KEY_SIZE     2048
set_var EASYRSA_CA_EXPIRE    3650
set_var EASYRSA_CERT_EXPIRE  825
set_var EASYRSA_CERT_RENEW   30
set_var EASYRSA_CRL_DAYS     180
In the process of installation these vars will be copied to container volume /etc/openvpn/pki/vars and used during all EasyRSA operations.
You can update all these parameters later with OpenVPN UI on Configuration > EasyRSA vars page.
Network configuration
This setup use tun mode, because it works on the widest range of devices. `tap`` mode, for instance, does not work on Android, except if the device is rooted.
The topology used is subnet, because it works on the widest range of OS. p2p, for instance, does not work on Windows.
The server config by default specifies push redirect-gateway def1 bypass-dhcp, meaning that after establishing the VPN connection, all traffic will go through the VPN. This might cause problems if you use local DNS recursors which are not directly reachable, since you will try to reach them through the VPN and they might not answer to you. If that happens, use public DNS resolvers like those of OpenDNS (208.67.222.222 and 208.67.220.220) or Google (8.8.4.4 and 8.8.8.8).
If you wish to use your local Pi-Hole as a DNS server (the one which comes with this setup), you have to modify a dns-configuration with your local Pi-Hole IP address.
This can be done on OpenVPN UI Configuration > Server config page as well.
OpenVPN client subnets. Guest and Home users
By default d3vilh/openvpn-server OpenVPN server uses 10.0.70.0/24 "Trusted" subnet for dynamic clients and all the clients connected by default will have full access to your Home network, as well as your home Internet.
However you can be desired to share VPN access with your friends and restrict access to your Home network for them, but allow to use Internet connection over your VPN. This type of guest clients needs to live in special "Guest users" subnet - 10.0.71.0/24:

To assign desired subnet policy to the specific client, you have to define static IP address for this client after you generate .OVPN profile.
To do that, just enter "Static IP (optional)" field in "Certificates" page and press "Create" button.
Keep in mind, by default, all the clients have full access, so you don't need to specifically configure static IP for your own devices, your home devices always will land to "Trusted" subnet by default.
Firewall rules
By default docker_entrypoint.sh of d3vilh/openvpn-server OpenVPN Server container will apply following Firewall rules:
IPT MASQ Chains:
MASQUERADE  all  --  ip-10-0-70-0.ec2.internal/24  anywhere
MASQUERADE  all  --  ip-10-0-71-0.ec2.internal/24  anywhere
IPT FWD Chains:
       0        0 DROP       1    --  *      *       10.0.71.0/24         0.0.0.0/0            icmptype 8
       0        0 DROP       1    --  *      *       10.0.71.0/24         0.0.0.0/0            icmptype 0
       0        0 DROP       0    --  *      *       10.0.71.0/24         192.168.88.0/24
You can apply optional Firewall rules in ~/openvpn-server/fw-rules.sh file, which will be executed on the container start.
Here is example to blocking traffic between 2 "Trusted" subnet clients:
~/openvpn-server $ cat fw-rules.sh
iptables -A FORWARD -s 10.0.70.88 -d 10.0.70.77 -j DROP
iptables -A FORWARD -d 10.0.70.77 -s 10.0.70.88 -j DROP
Check detailed subnets description on here.
OpenVPN Pstree structure
All the Server and Client configuration located in Docker volume and can be easely tuned. Here are tree of volume content:
|-- clients
|   |-- your_client1.ovpn
|-- config
|   |-- client.conf
|   |-- easy-rsa.vars //EasyRSA vars draft, see below real vars file.
|   |-- server.conf
|-- db
|   |-- data.db       //OpenVPN UI DB
|-- log
|   |-- openvpn.log
|-- pki
|   |-- ca.crt
|   |-- vars          // EasyRSA real vars, used by all applications
|   |-- certs_by_serial
|   |   |-- your_client1_serial.pem
|   |-- crl.pem
|   |-- dh.pem
|   |-- index.txt
|   |-- ipp.txt
|   |-- issued
|   |   |-- server.crt
|   |   |-- your_client1.crt
|   |-- openssl-easyrsa.cnf
|   |-- private
|   |   |-- ca.key
|   |   |-- your_client1.key
|   |   |-- server.key
|   |-- renewed
|   |   |-- certs_by_serial
|   |   |-- private_by_serial
|   |   |-- reqs_by_serial
|   |-- reqs
|   |   |-- server.req
|   |   |-- your_client1.req
|   |-- revoked
|   |   |-- certs_by_serial
|   |   |-- private_by_serial
|   |   |-- reqs_by_serial
|   |-- safessl-easyrsa.cnf
|   |-- serial
|   |-- ta.key
|-- staticclients    //Directory where stored all the satic clients configuration
Generating .OVPN client profiles
You can update external client IP and port address anytime under "Configuration > OpenVPN Client" menue.
For this go to "Configuration > OpenVPN Client" (don't trust what you see, this picture is outdated):

And then update "Connection Address" and "Connection Port" fields with your external Internet IP and Port.
To generate new Client Certificate go to "Certificates", enter new VPN client name in the field at the page below and press "Create" to generate new Client certificate:


To download .OVPN client configuration file, press on the Client Name you just created:

Install Official OpenVPN client to your client device.
Deliver .OVPN profile to the client device and import it as a FILE, then connect with new profile to enjoy your free VPN:


Renew Certificates for client profiles
To renew certificate, go to "Certificates" and press "Renew" button for the client you would like to renew certificate for:

Right after this step new Certificate will be genrated and it will appear as new client profile with the same Client name. At this point both client profiles will have updated Certificate when you try to download it.
Once you will deliver new client profile with renewed Certificate to you client, press "Revoke" button for old profile to revoke old Certificate, old client profile will be deleted from the list.
If, for some reason you still would like to keep old certificate you have to "Revoke" new profile, old certificate will be rolled back and new profile will be deleted from the list.
Renewal process will not affect active VPN connections, old client will be disconnected only after you revoke old certificate or certificate term of use will expire.
Revoking .OVPN profiles
If you would like to prevent client to use yor VPN connection, you have to revoke client certificate and restart the OpenVPN daemon.
You can do it via OpenVPN UI "Certificates" menue, by pressing "Revoke" amber button:

Certificate revoke won't kill active VPN connections, you'll have to restart the service if you want the user to immediately disconnect. It can be done from the same "Certificates" page, by pressing Restart red button:

You can do the same from the "Maintenance" page.
After Revoking and Restarting the service, the client will be disconnected and will not be able to connect again with the same certificate. To delete the certificate from the server, you have to press "Remove" button.
Screenshots:


Дякую and Kudos to the original author
Kudos to @adamwalach for development of original OpenVPN-WEB-UI interface which was ported for arm32v7 and arm64V8 with expanded functionality as part of this project. #Thats all folks!

Tag summary
Content type
Image
Digest
sha256:81af28f9c…
Size
27 MB
Last updated
over 1 year ago
docker pull d3vilh/openvpn-ui